
Give your old couch a facelift by reupholstering it! This project is not for the faint of heart, but this step-by-step photo tutorial will walk you through the steps I took to save thousands!
When we first married, we needed a couch. So we found one on craigslist for $100.
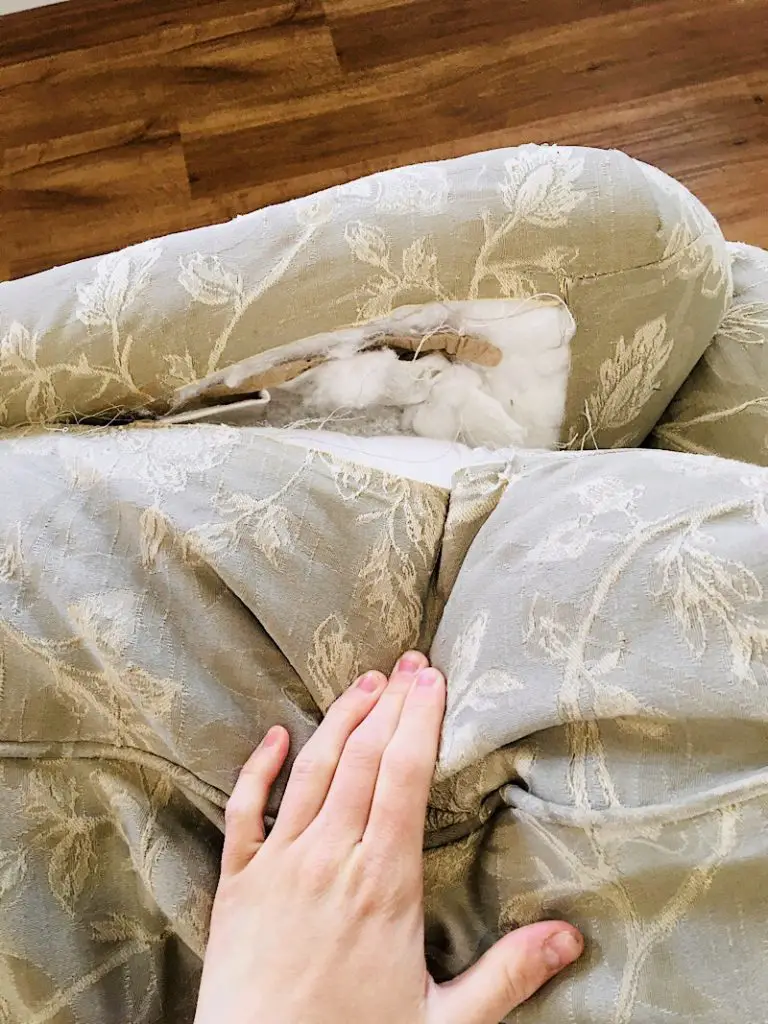
It was a decent couch, with good bones and pretty wood accents. But after having it for a few years, it was seriously worn. I didn’t want to fork over the cash to replace it… so I took of the mammoth project of learning to reupholster it!
Here’s how I did it.
This post may contain affiliate links. Read the full disclosure here.
About This Tutorial
Reupholstering a couch is an advanced project. It involves taking all the old upholstery off, refinishing the couch, and then sewing and stapling on new upholstery.
In fact, although this is a sewing tutorial, most of this project was stapling!
If you want to try to makeover your sofa but aren’t quite ready to tackle reupholstery, then you might be better off sewing a slipcover. A slipcover is still an advanced project but arguably not as hard as completely reupholstering it.
You can also try upholstering a small chair or footstool first, to get some practice (which is what I did!)
Your couch will be different than mine, of course. But I hope these photos will help give you guidance.
Finally, I recommend you take lots of photos as you take your couch apart, so that you have references on how to put it back together!
Here is a reference of what the old couch looked like before…
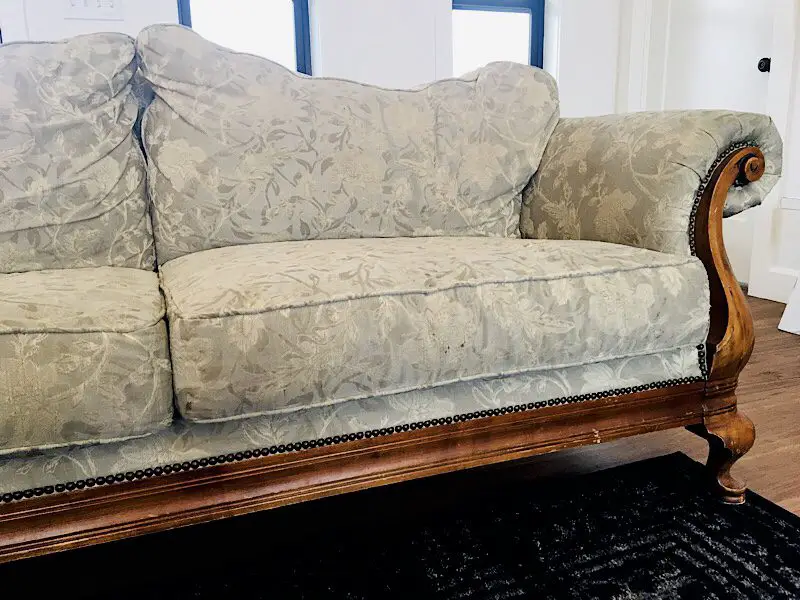
It had hugge ripped spots that I had handsewed so many times…
Supplies Needed

- Fabric Scissors
- Sewing Machine
- Sewing Pins
- Measuring Tape
- Seam Ripper
- Machine Sewing Needle (You may need to get a heavy duty needle depending on your fabric choice)
- Staple Gun and staples
- Upholstery Tack Remover (I didn’t think I needed this at first… I ended up buying it and being SO glad!)
- Needle nose Pliers
- Citristrip and Wire Brush(Not needed if you don’t have wood to refinish)
- Wood Stain (Not needed if you don’t have wood to refinish)
- Plastic wrap (Not needed if you don’t have wood to refinish)
- Cardboard upholstery tack strips (Or you can make your own with strips of cardboard, like I did.)
Materials Needed
- Upholstery Fabric (10-16 yards depending on your couch measurements)
- Heavy Duty Velcro (Optional, I used it to attach the cushions onto the couch)
- Replacement dust cover for the bottom of the couch
- Batting (if you want to add some extra batting under the fabric)
- Matching Thread
- Replacement tacks or trim to finish the edging (Here’s How to make your own double welt piping!)
- Replacement Cushion Zippers (Optional, I reused the old zippers on my cushions!)
How To Reupholster A Couch
Step 1. Measure Your Couch & Purchase Fabric
Use a measuring tape to measure every fabric surface of your couch, plus several inches on both sides. You will need to measure:
- The back of the couch
- The arms
- Each side of each cushion
- Interior surfaces (Underneath/behind the cushions
Take note of how much of the main upholstery fabric you will need, as well as how much of the interior fabric you will need. Usually, the fabric underneath the cushions is a thinner, cheaper material since it will be hidden.
The material on the very bottom of the couch is called a dust cover. Measure the dimensions for it as well (I ended up using an old bed sheet instead of a dust dover to save money. Or, if you are very careful when removing it, you can reuse the old one.)
When purchasing your materials, I highly recommend going to the fabric store in person to select a fabric for your couch. It is so much easier when you can see and touch it in person! That being said, I ordered mine online and made sure to order a TON of samples before I chose which one. I think I spent $40 on samples… but it was so worth it.
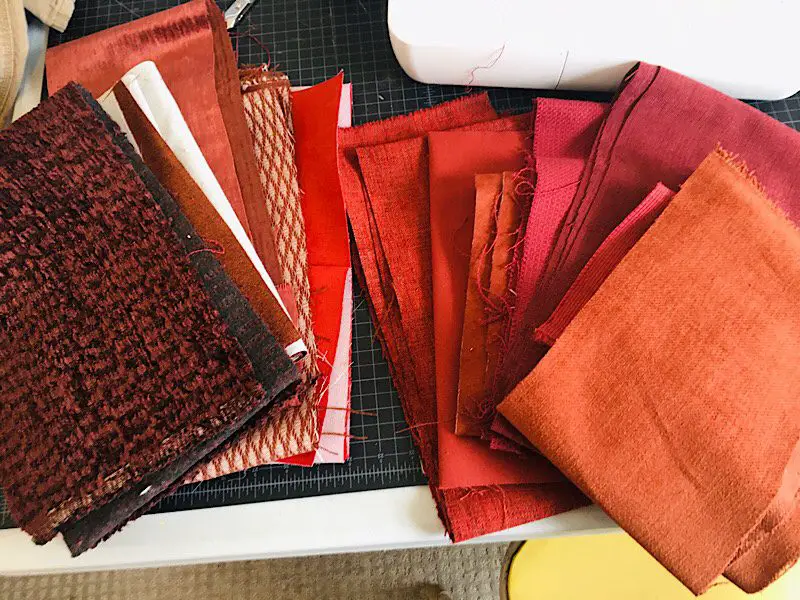
Pick a fabric that is made for upholstery. It has to be thick and strong enough to withstand the heavy wear and tear of being sat on, but not so thick that it is hard to fold and staple. Make sure to round up, and get a little more than you think you need. I ended up buying 14 yards, and using about 12-13. (If you have extra, you can make throw pillows!)
Where Can You Buy Upholstery Fabric?
You should be able to find upholstery fabric at any store that sells fabrics, but if you are picky like me and need options, you might want to try ordering swatches online! Here are a few places you could look:
- Fabricdepot.com (This is where I purchased my fabric.)
- Fabricdirect.com (As of the time of writing, they have a 30 day, no-questions-asked return policy on all unaltered fabric!)
- HobbyLobby.com
- Joann.com
- Fabric.com
- Mood.com
- Etsy.com (There are a lot of very cool and unique fabrics here!)
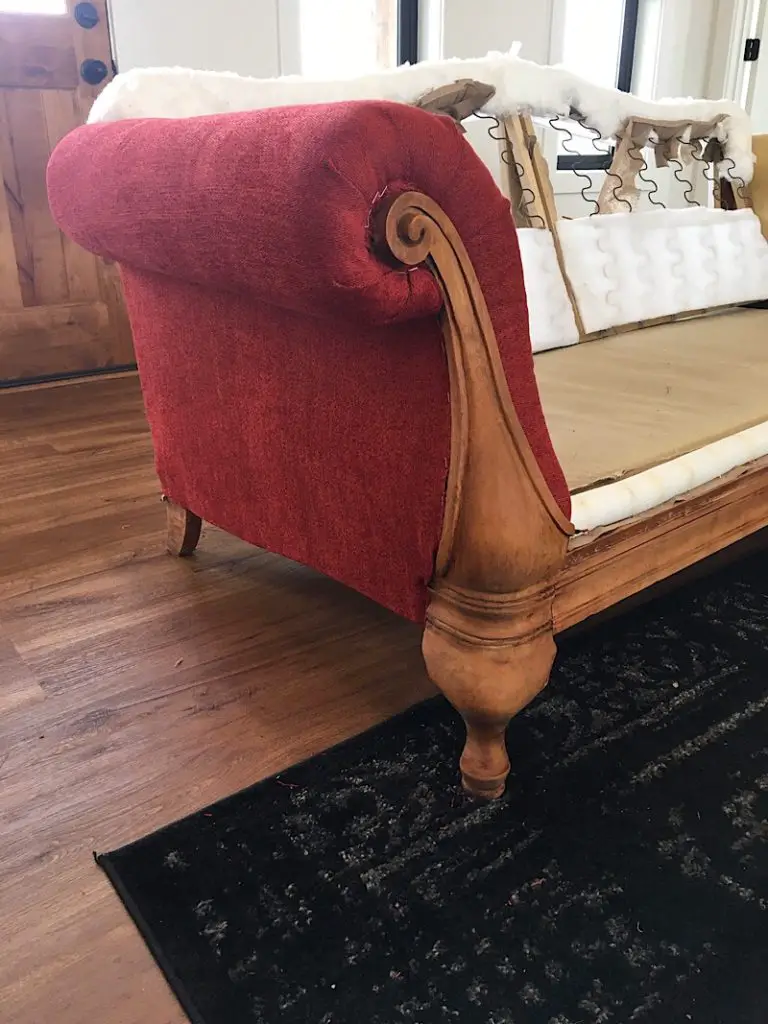
Step 2. Remove The Legs & Old Upholstery
The first step is to remove the legs of your couch if you need to. Some couches have legs that are attached on top of the dust cover. (My couch’s dust cover was folded around the legs, so I didn’t need to remove them.)
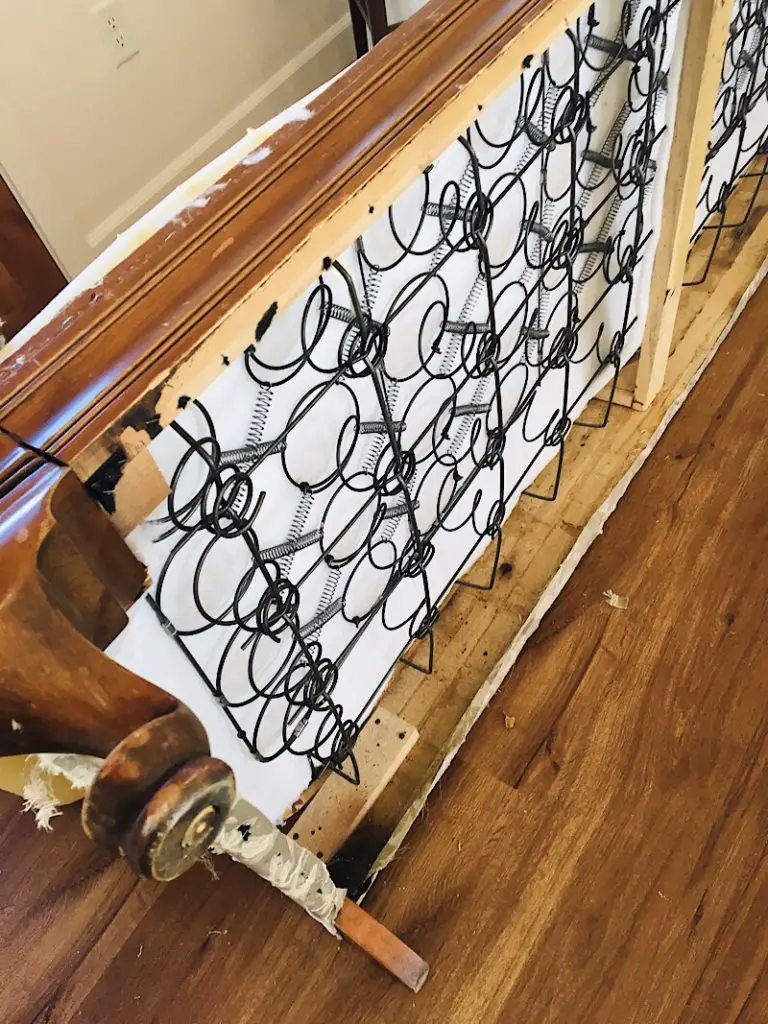
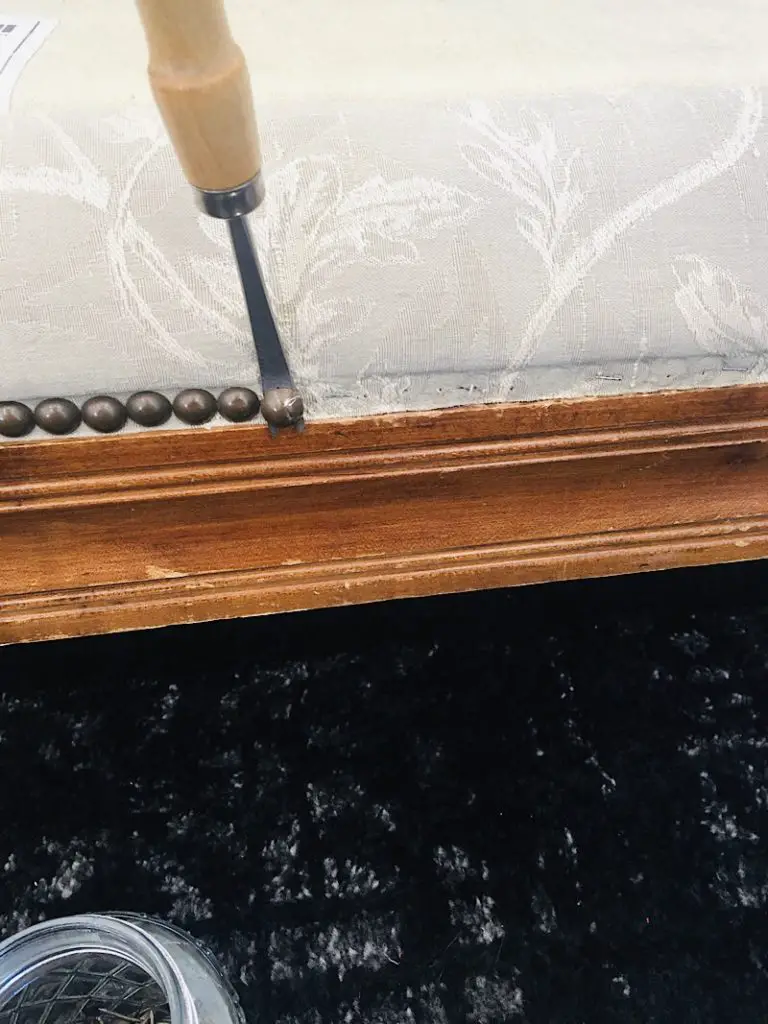
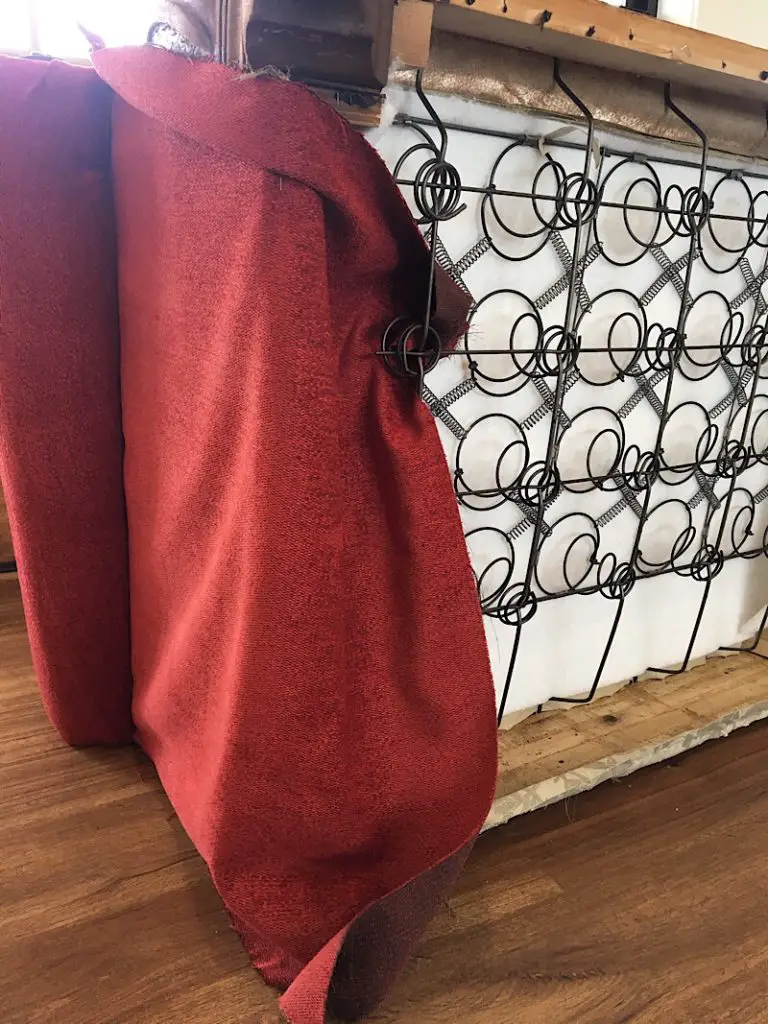
Flip the couch over so the legs are accessible and remove them. Put any screws into a plastic bag and label them. Then, using your tack remover, take off the dust cover. You’ll see all the springs inside, and you might find some lost pens/treasures like I did!
Next, work your way around the couch with your pliers and tack remover, taking out all the decorative tacks. Put the tacks into a container or trash can so you don’t accidentally step on them, and wear eyewear just in case a staple goes flying (some of them are hard to pry out!)
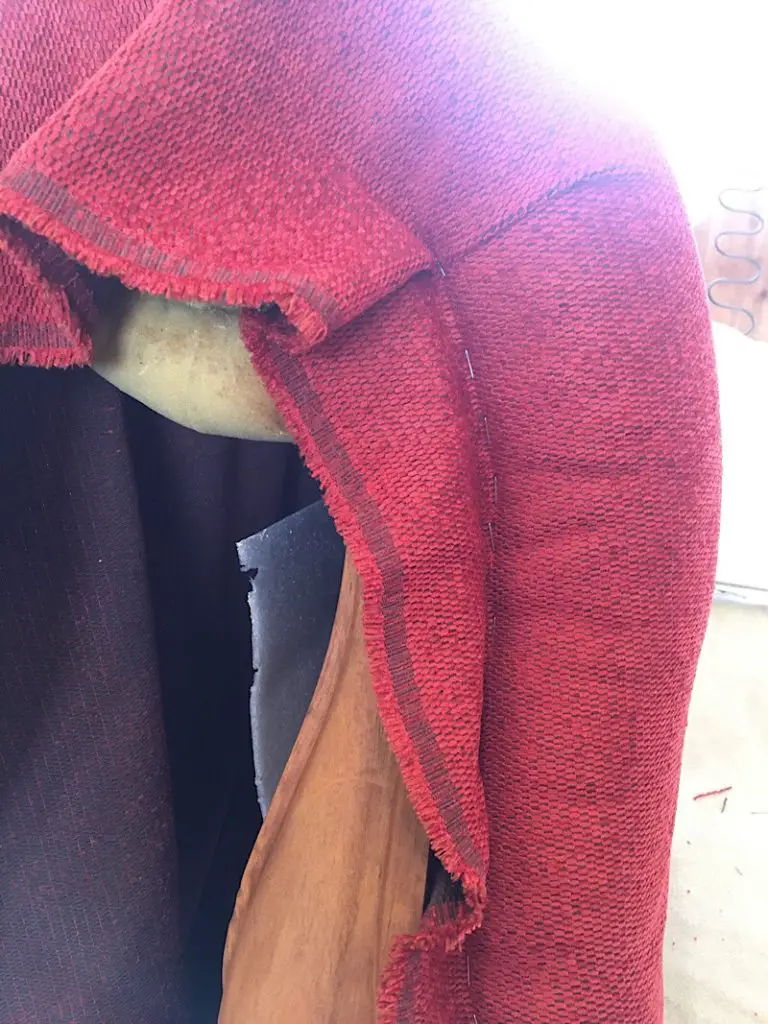
After the tacks are removed, it’s time to remove the staples and fabric.
Upholstery fabric is attached to the couch in layers, so you will want to remove the top layer first. Usually, this is the back panel piece of fabric. Use your tools to pry out all the staples around the edges of the piece of fabric, then remove the fabric.
Really take the time to analyze and observe how your couch’s fabric was originally put together. Take notes if you need to!
You might need to cut the back cushions off of the couch if they are attached like mine were. When cutting, make sure to cut straight lines along seams if you can, just in case you need to piece things back together later to see how it is supposed to fit when you are reupholstering it.
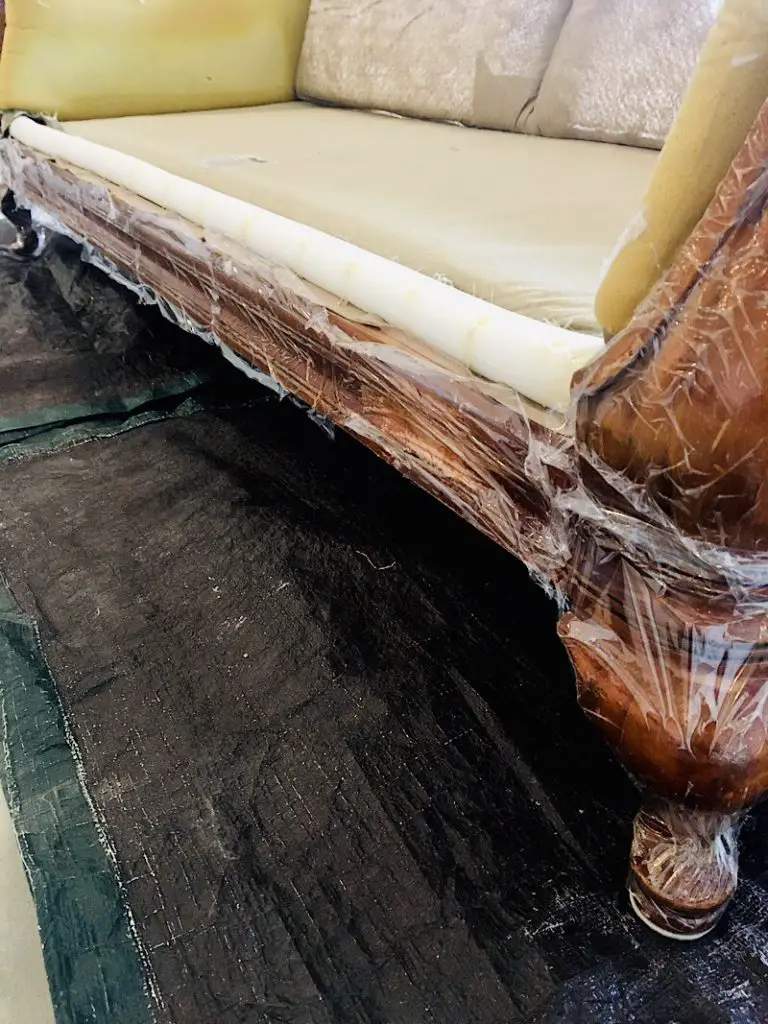
When your old fabric is removed, you should just see batting and foam on the frame of the couch.
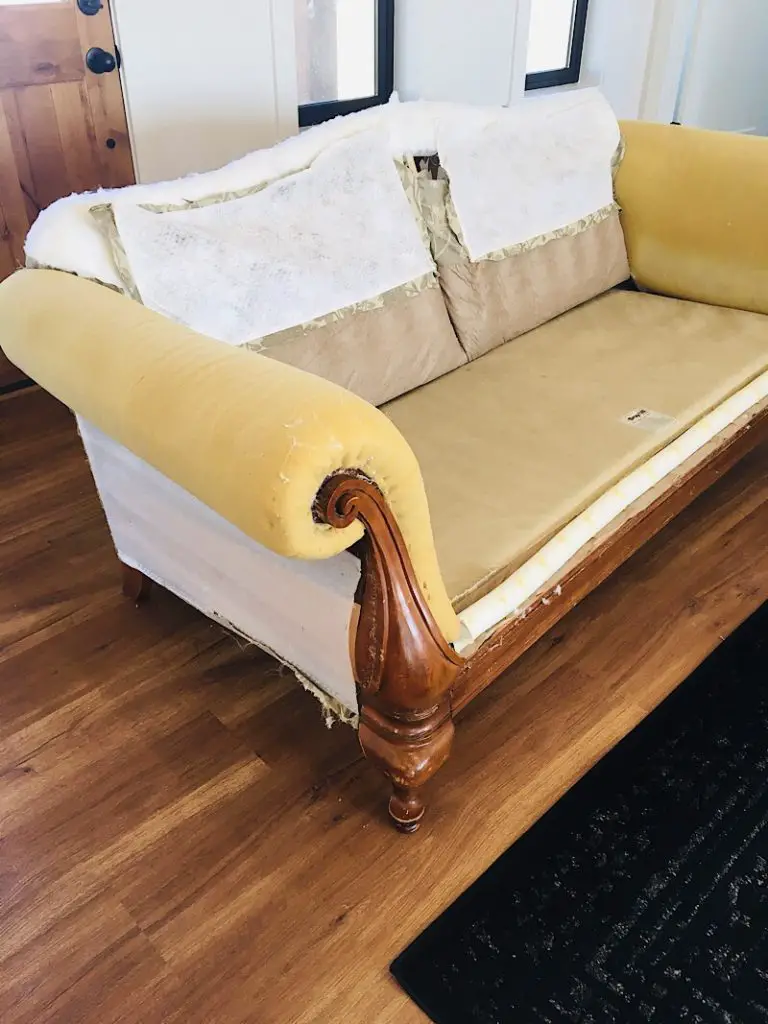
Step 3. Touch Up The Frame
Now you will prepare the frame for the new fabric. This includes making repairs to the wood if needed and vacuuming it out.
If you are going to refinish any wood elements, use citristrip to strip the stain by wrapping it in plastic wrap for a few hours, then scraping it off with a wire brush. Be careful not to get any stain remover on the foam.
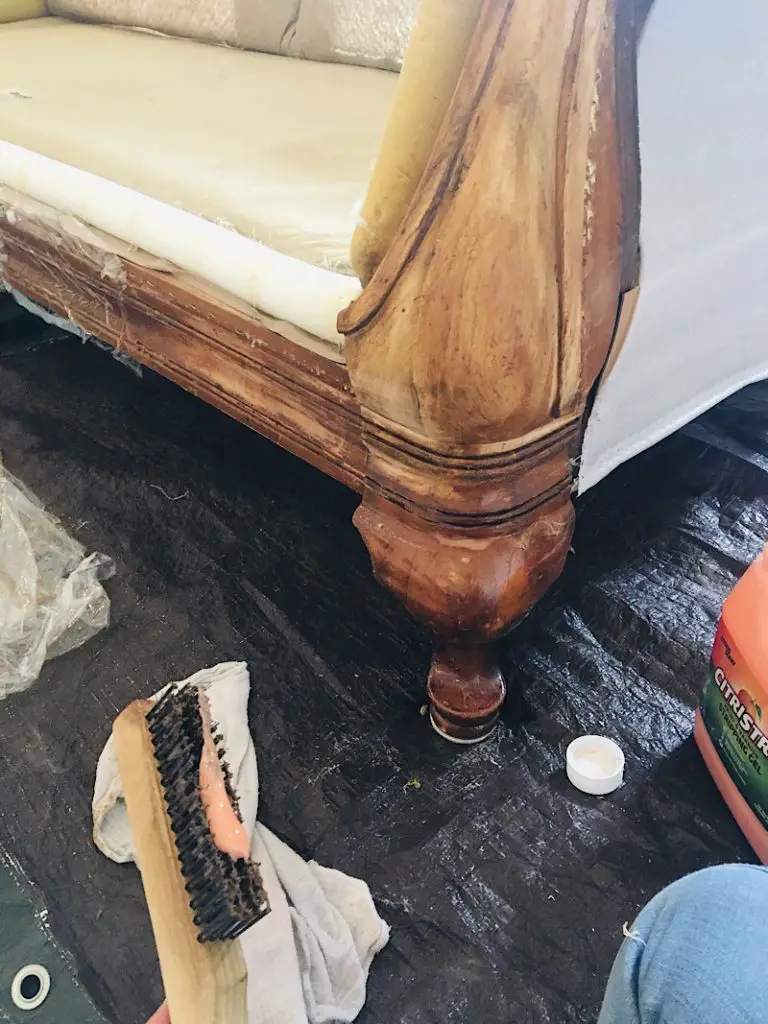
Then re-stain and seal the wood.
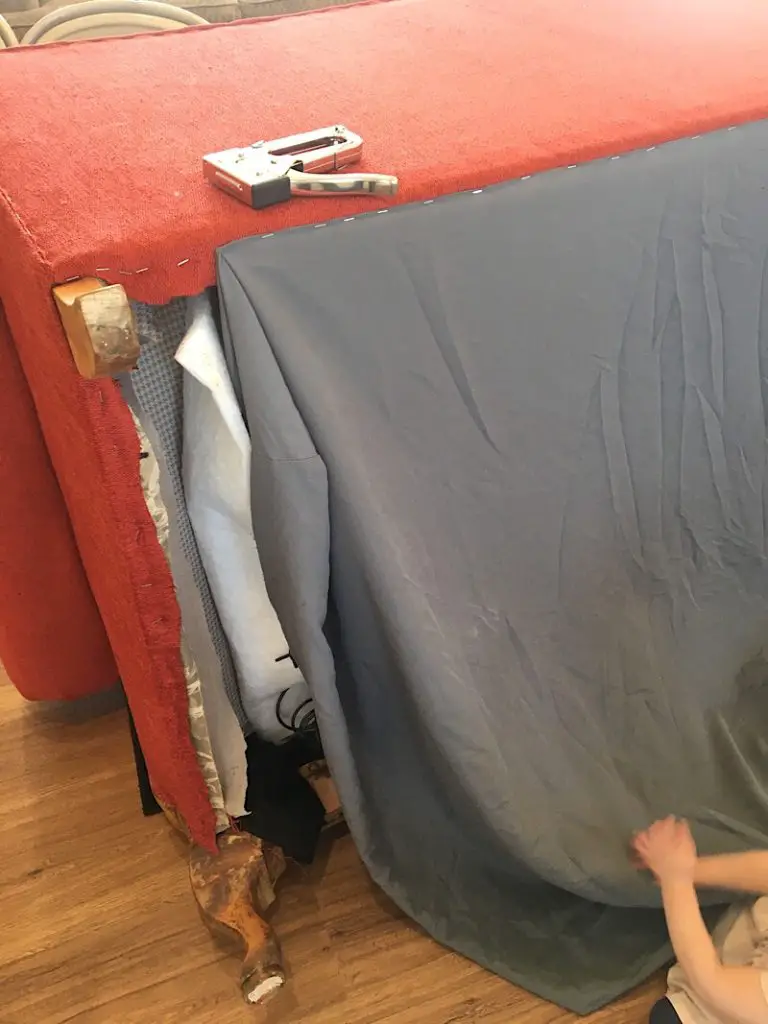
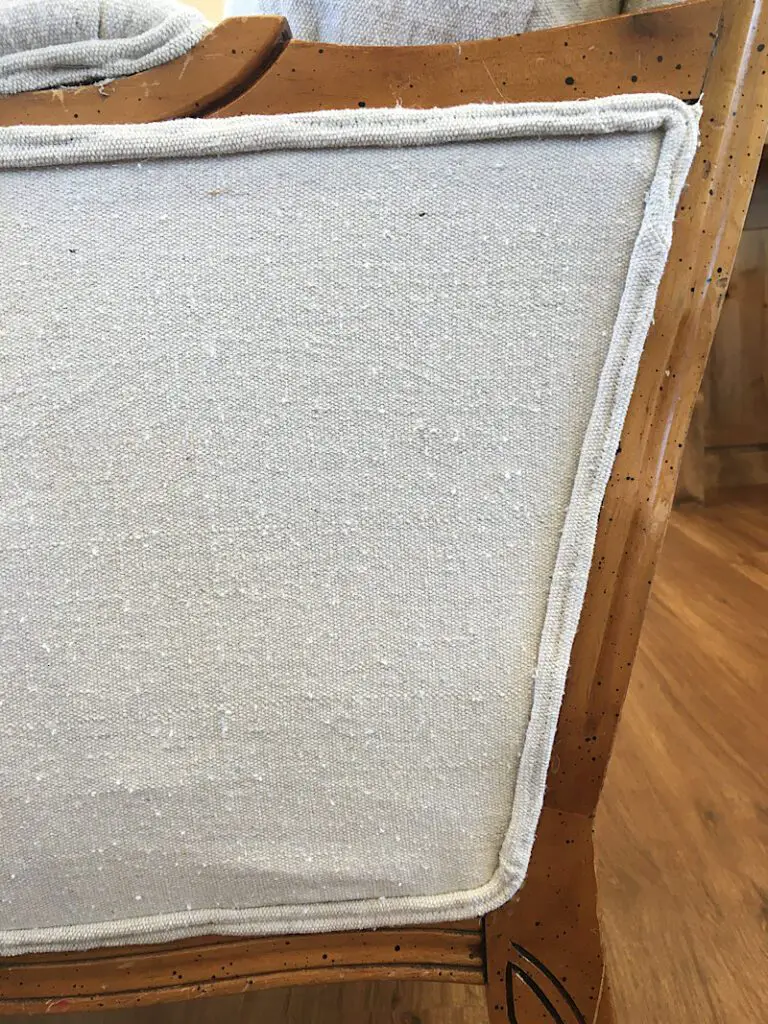
Step 4. Attach The New Fabric
Instead of cutting out piece of fabric and then stapling them on, I recommend you work off the roll as best as you can. Lay a piece out over the area you are attaching the fabric to, then cut it to size as you go. You might end up with too-small pieces if you precut the fabric. (I learned this the hard way.)
Remember the order you removed the fabric from the couch? You will replace the fabric in that reverse order. So if you took off the back piece of the couch upholstery first, you will replace that piece last.
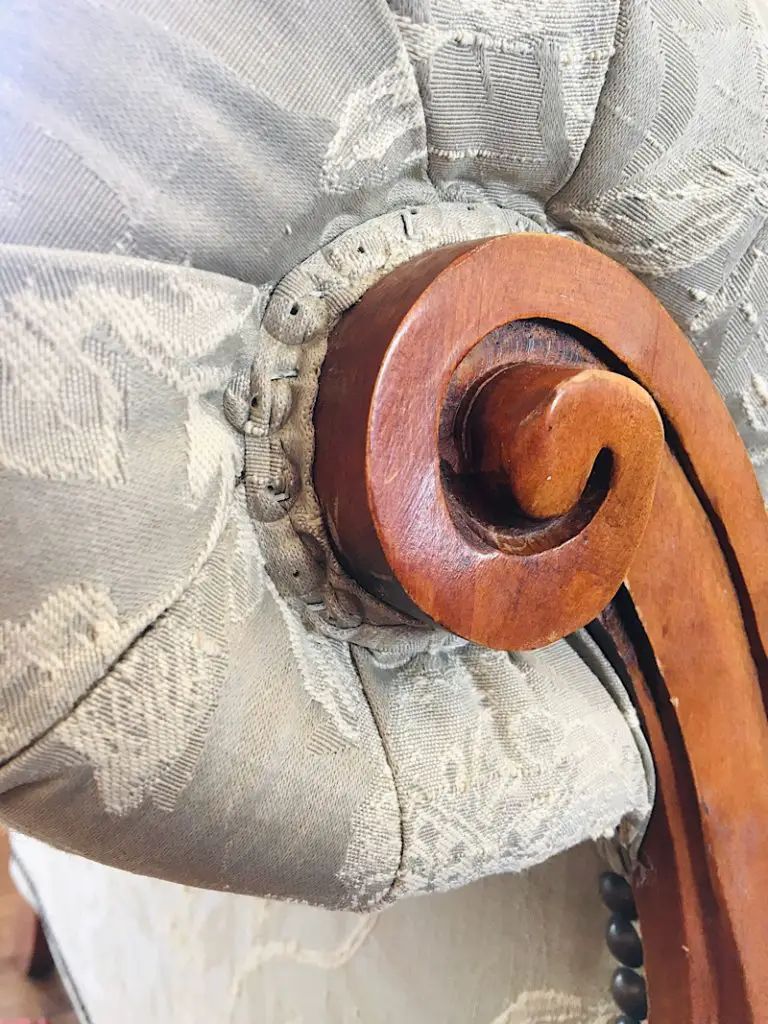
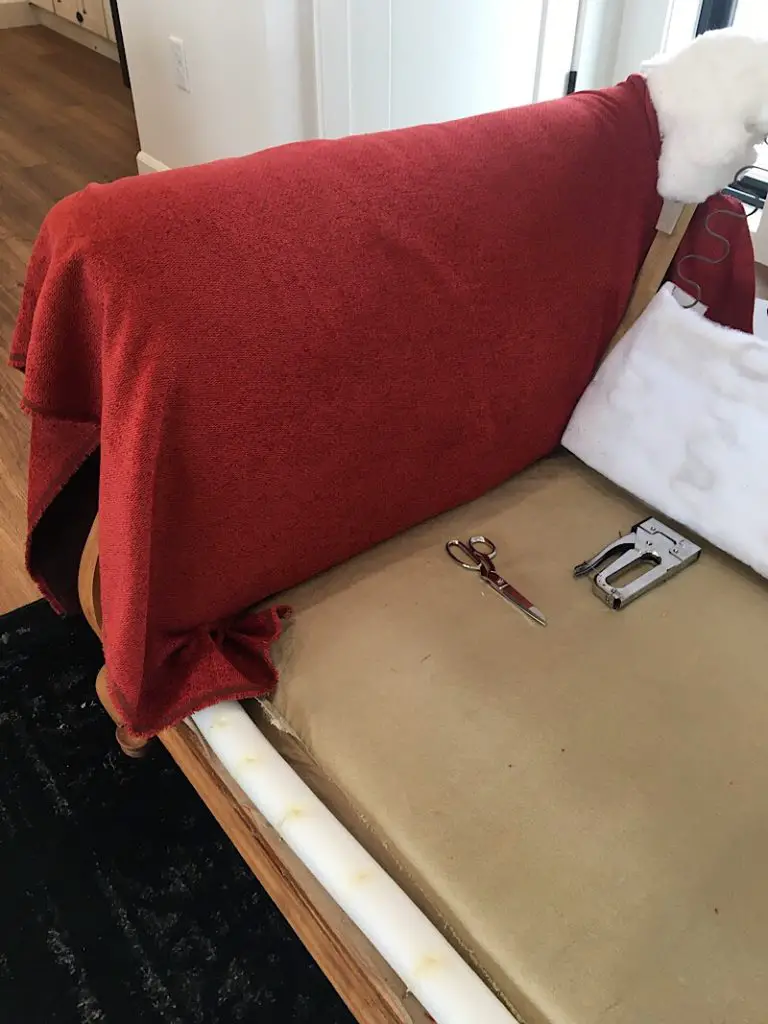
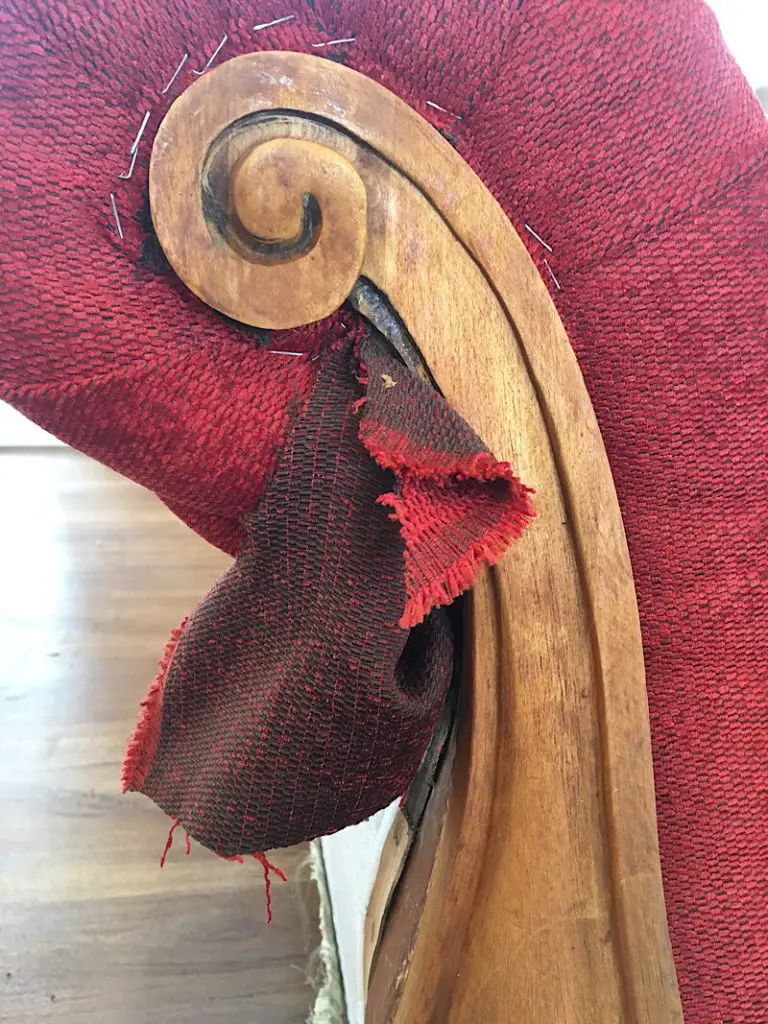
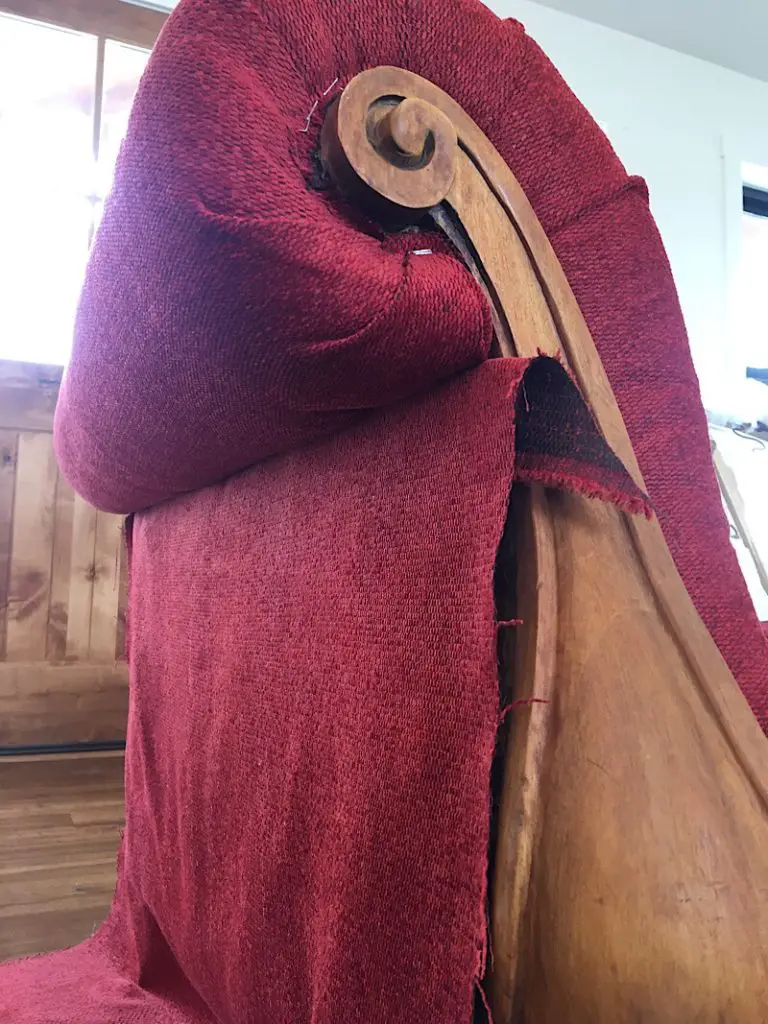
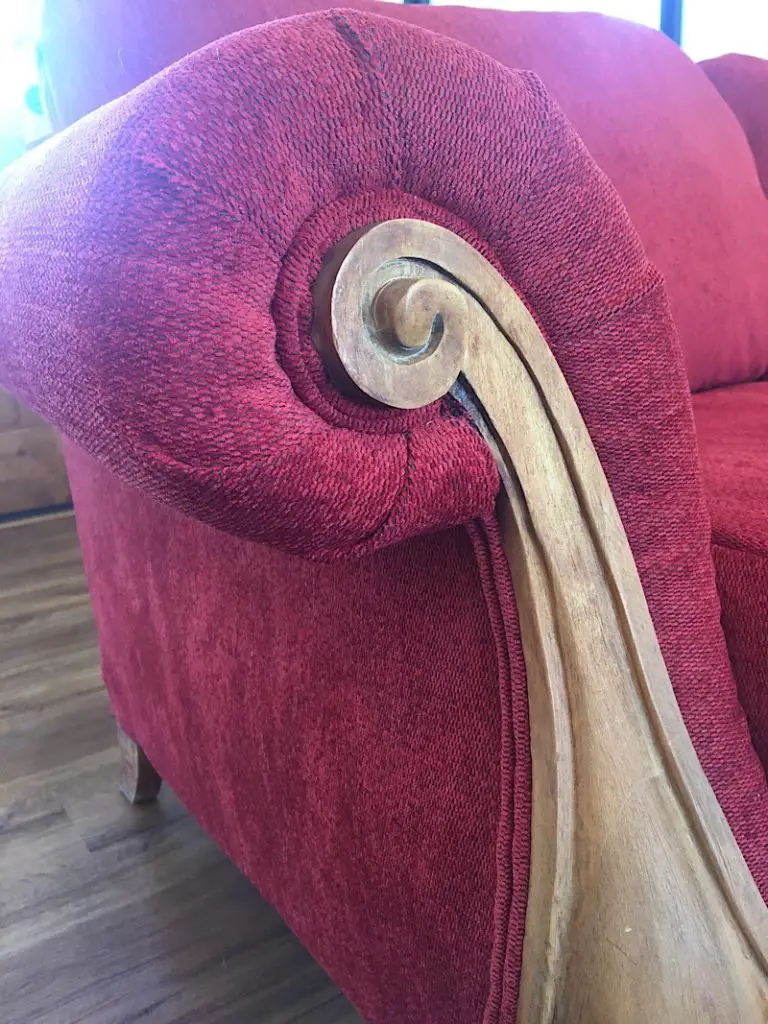
I started with the arms. If your couch has arm pieces that need to be sewn, you can use your seam ripper to open up the old arms and trace them to make new ones. My couch arms were not sew, just draped.
Drape the fabric over the arms, then cut it to size.

Next, smooth out the fabric and tuck it down the couch under the seat.
When you staple it down underneath the couch, wrap and staple it towards the arm, not towards the seat portion, or else when you try to tuck and staple the seat cover, there will be fabric blocking the path!
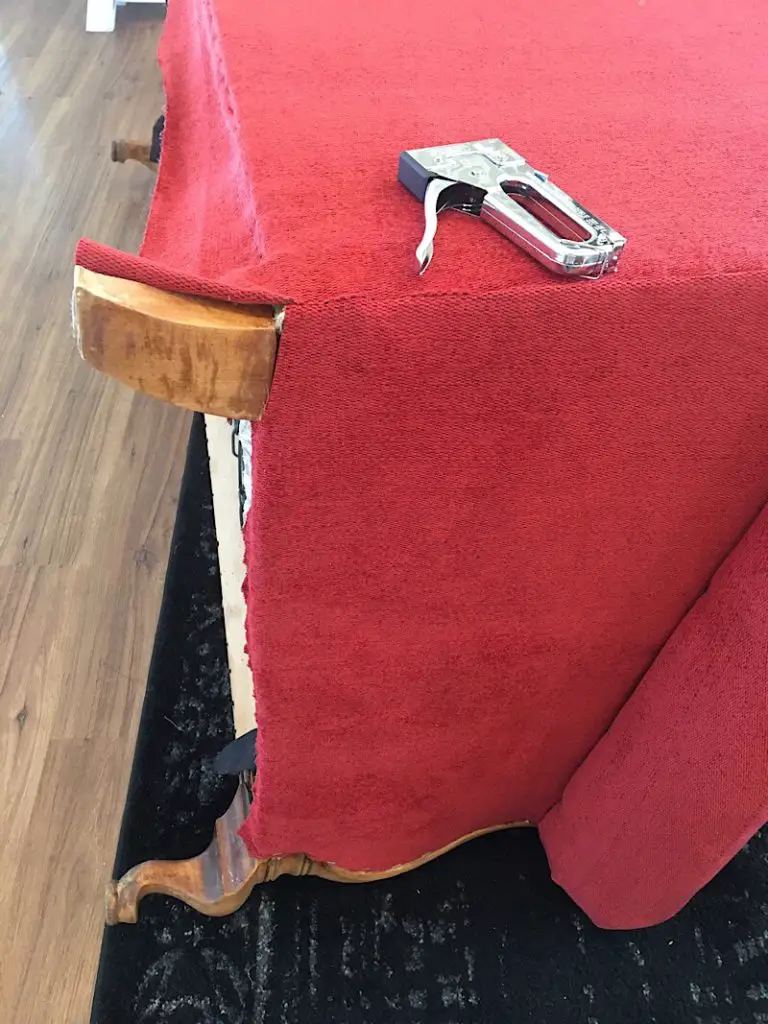
Carefully wrap and fold the fabric up over the arm, and practice how you want it to look. Then, staple it down along the edges.
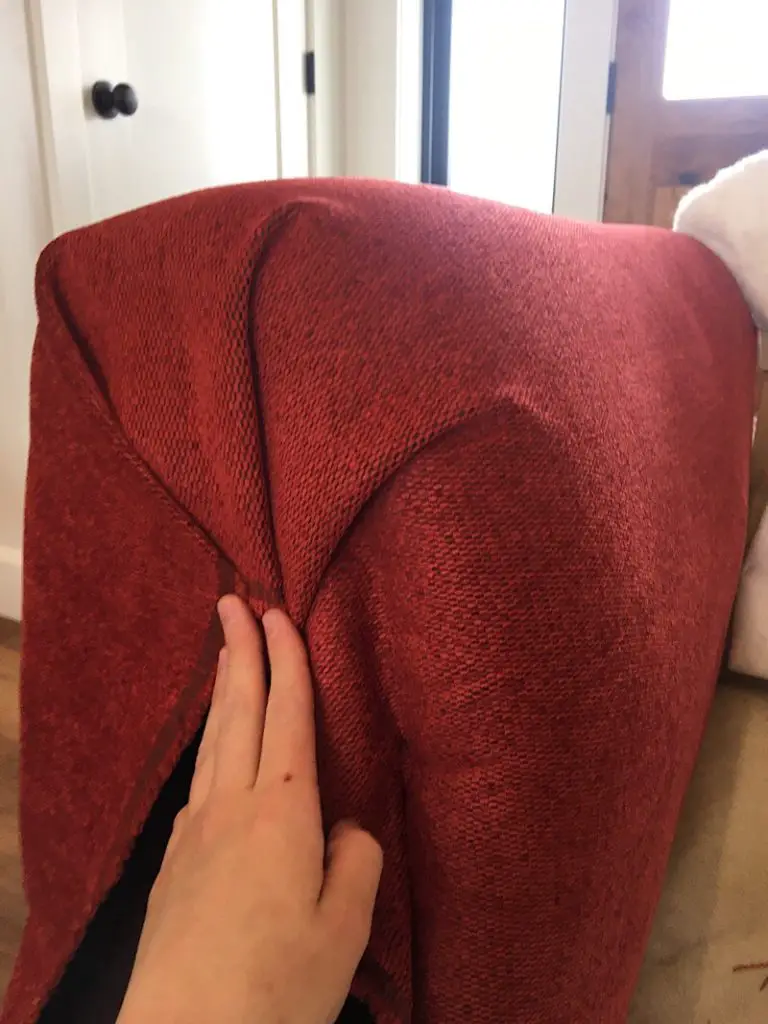
Staple as close to the wood as you can, while folding the fabric over. You want to continue this fabric over the entire arm, then down the side of the couch just a few inches so there are no gaps. Fold the raw edges in underneath the other work to hide them. When you are done, trim the excess fabric.
The back side of the arm is done in a similar manner, folding and stapling the material around the back of the couch.

On my couch, the outside edges of the arms were created with tack strips to give them a nice edge and hide the staples.
The easiest way to make and apply a tack strip is to cut an inch thick strip of cardboard, and use a glue stick to glue it to the edge of the wrong side of your fabric.
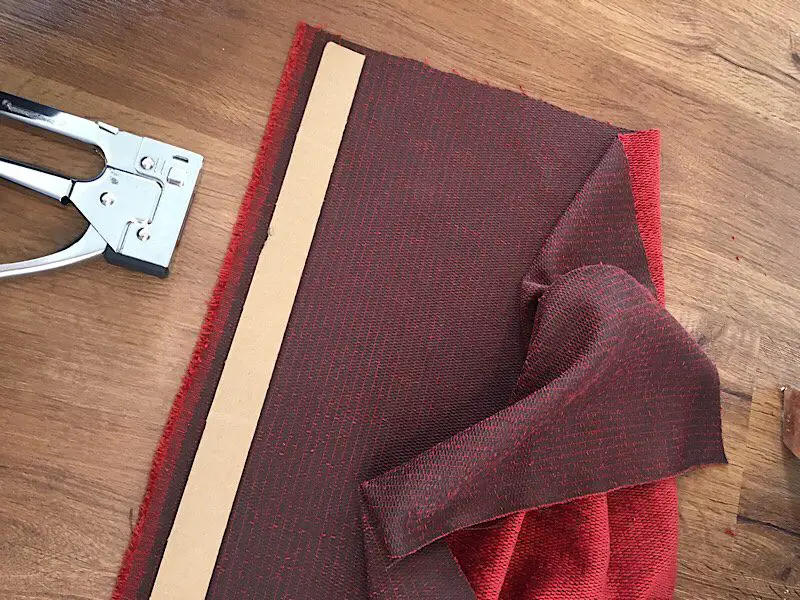
Then, fold the fabric over so it hides the strip. Hold the strip up to the couch where you want it to be placed with the fabric hanging loosely down over front of it.
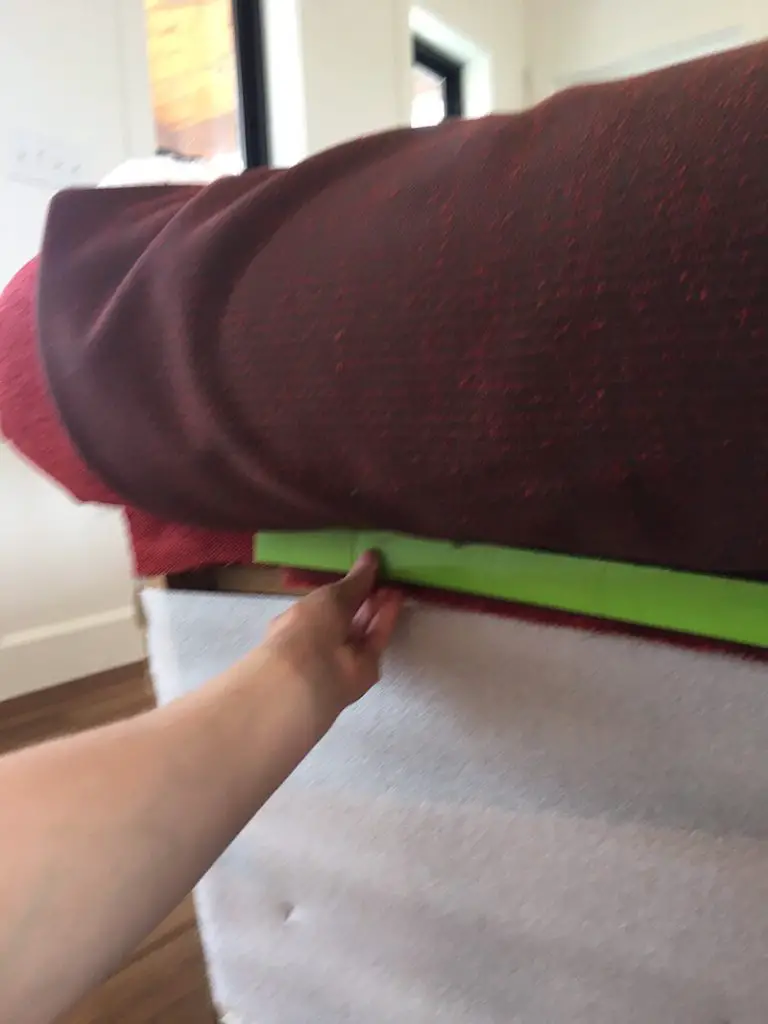
Then, lift the fabric up so you can see the cardboard strip, and staple it in place very well.
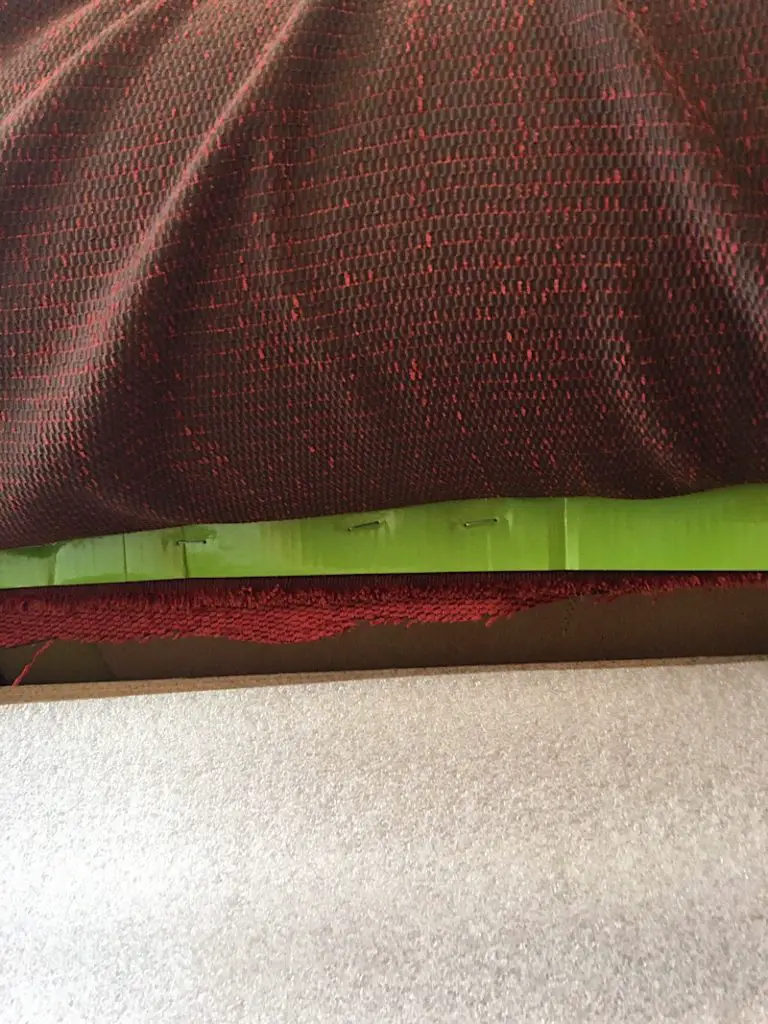
When you drape the fabric back down over front of the strip, it will have a crisp top edge with no visible staples.
Staple the bottom of the fabric under the couch. Staple the back side of the fabric by wrapping it over the back of the couch, and staple the front as close to the wood as you can so it will be covered with trim later.
This completes the arm reupholstery!
Now you need to repeat these steps to do the other arm as well.
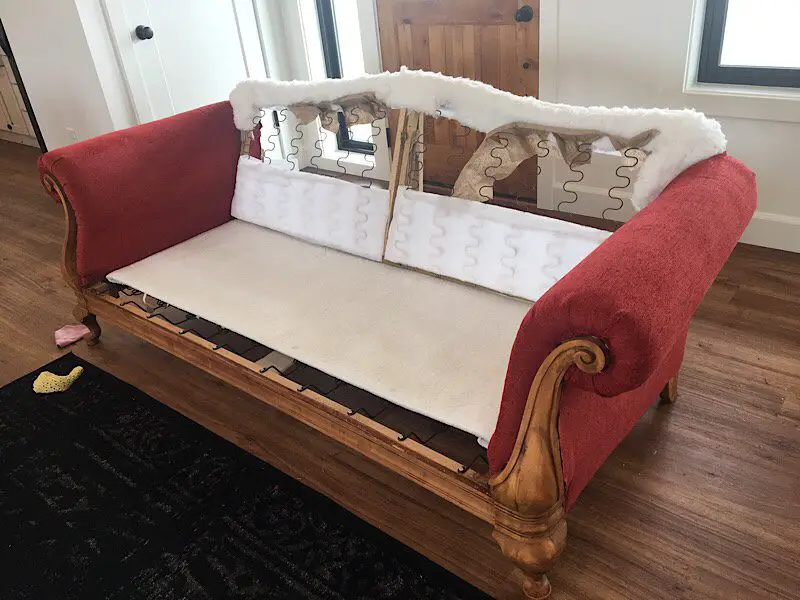
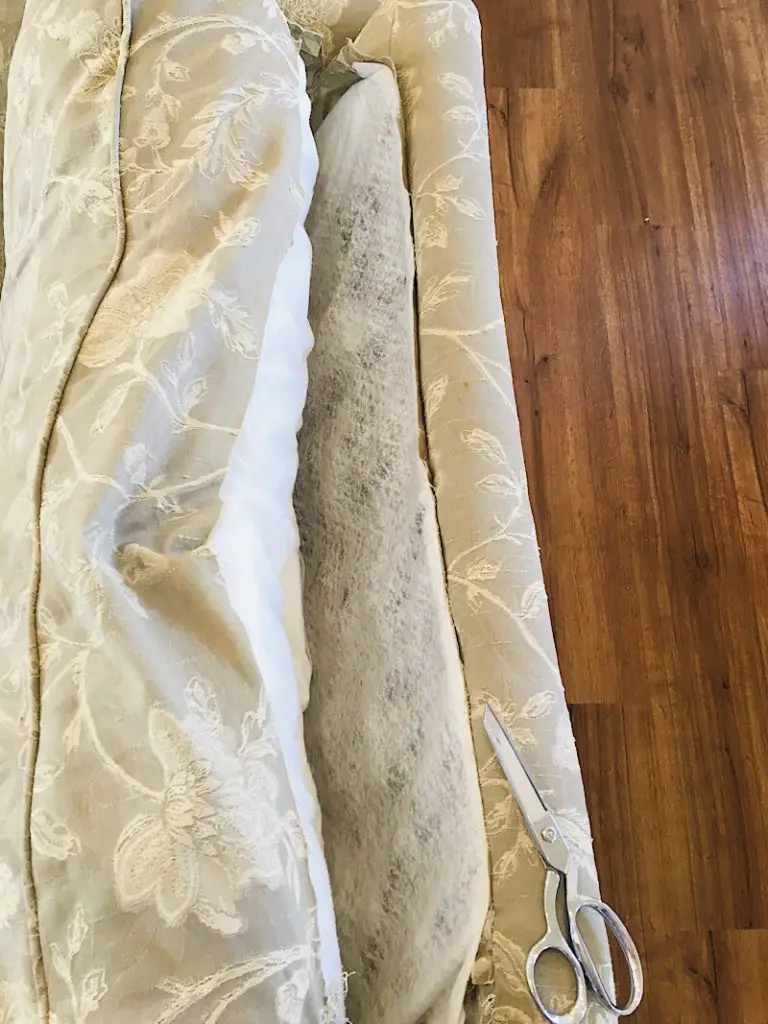
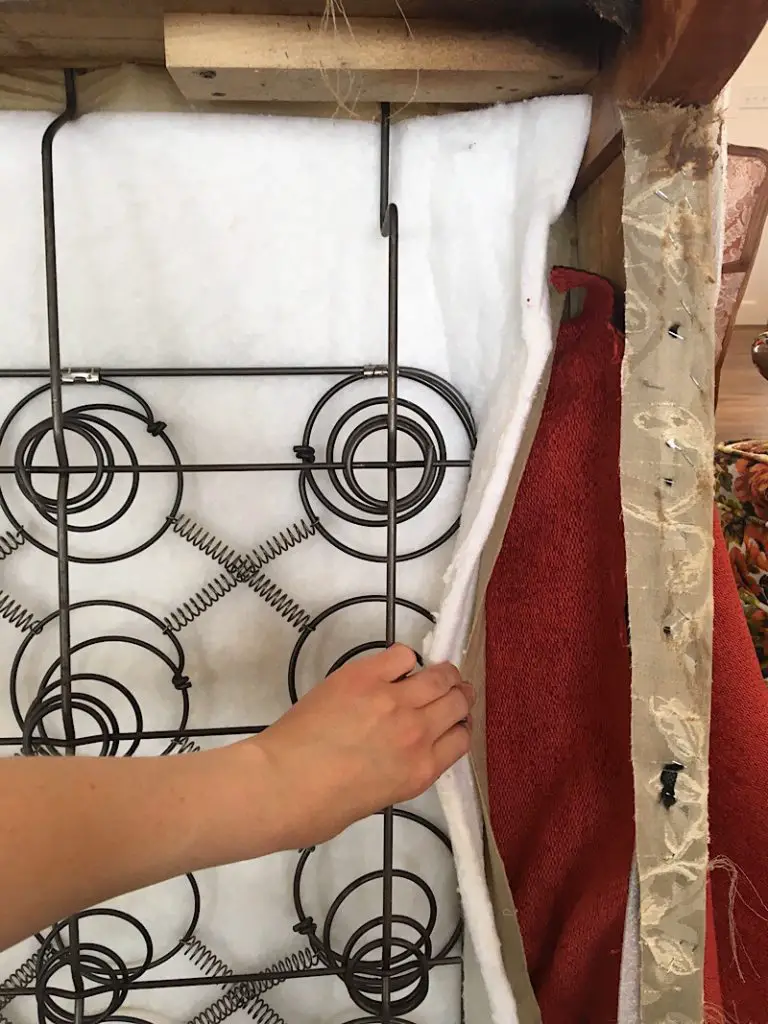
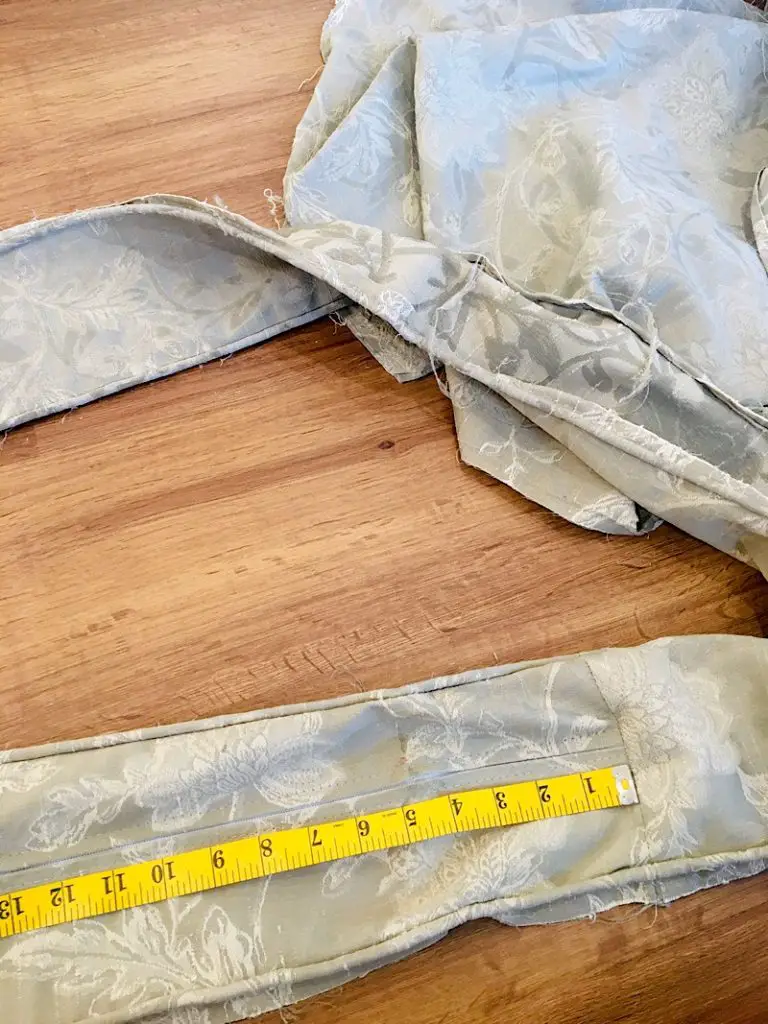
The two interior surfaces will need to be sewn if you are using a thinner material along with the upholstery material.
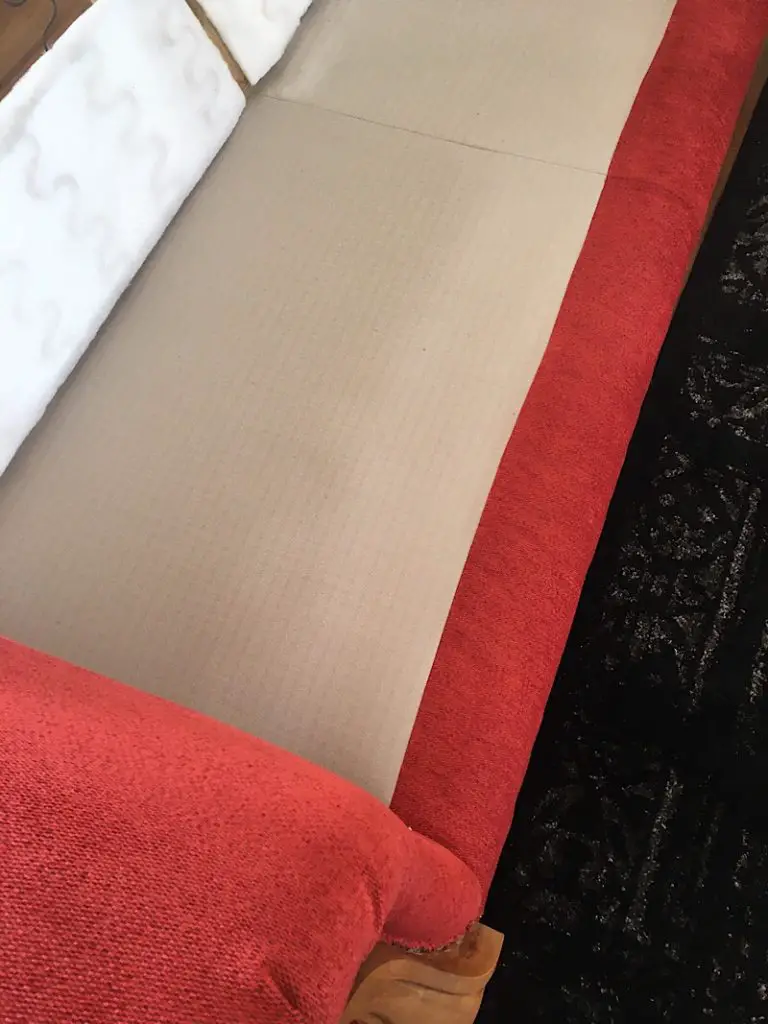
I made the seat portion by sewing a thick strip of the upholstery fabric to a large rectangle of the thinner fabric. The upholstery piece will be at the front where your knees hang down.
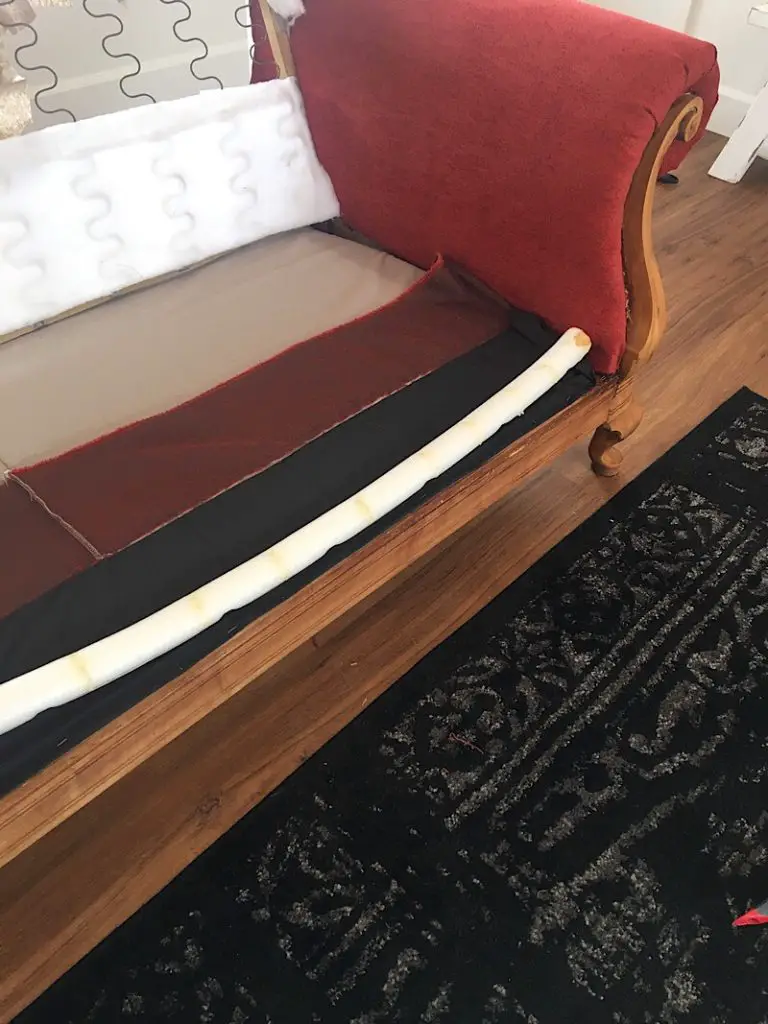
My couch had a pool noodle type padding on the front that I also added some extra batting to.
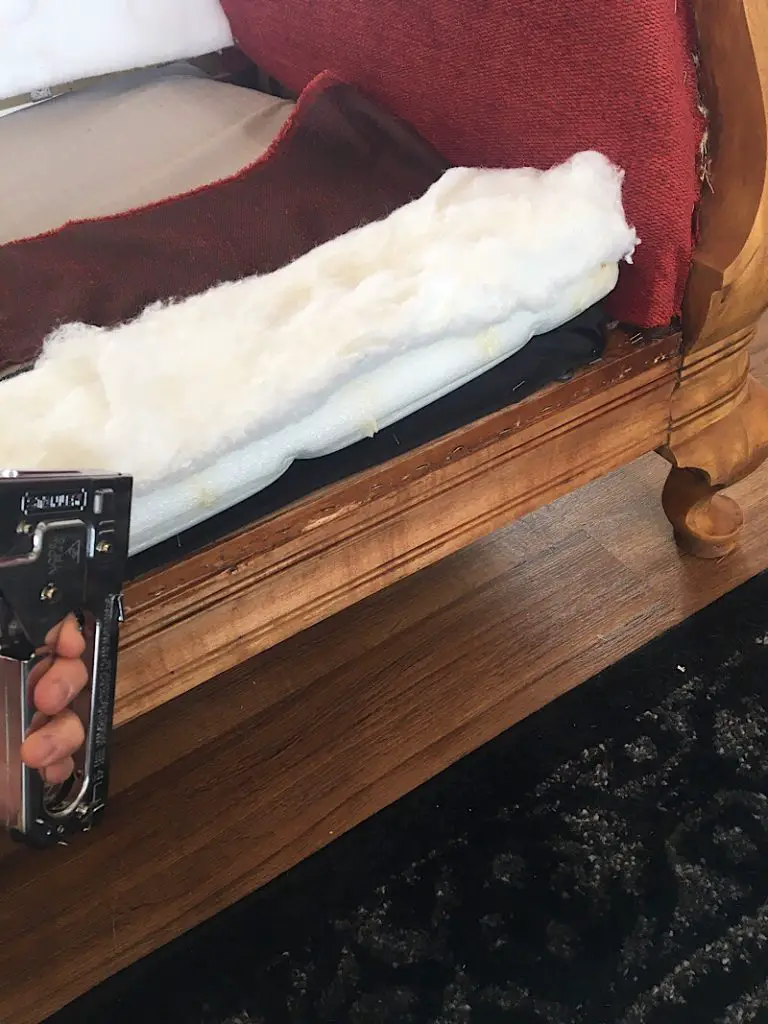
Staple the fabric to the front of the couch only where a row of trim or tacks will hide the staples. Tuck the sides down the sides of the couch and make sure there are no puckers and everything is smooth.
The inside back of the couch is made the same way, with a thinner strip of the upholstery fabric on top and two sides, (where ever it would be exposed) and wrapping up over the back edge, with the thinner fabric lower inside where it will be hidden.
I sewed strips of hook and loop to the back of mine before stapling it on, so that I could attach the cushions securely later.
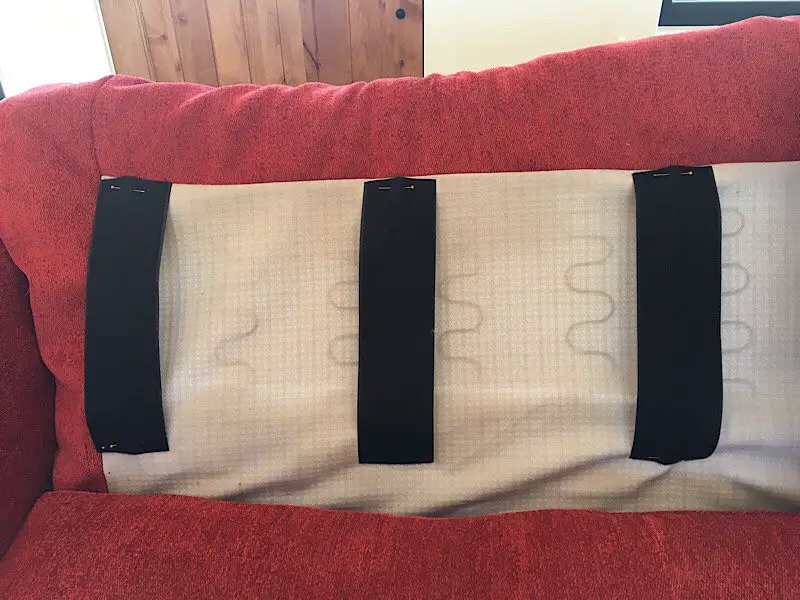
Then staple the fabric on and fold it neatly around the top curves.

To attach the back piece, you might use another tack strip for the top if you have a square couch. Mine was simply stapled down and then covered with trim. I folded the raw edges under and stapled it down near the edge.
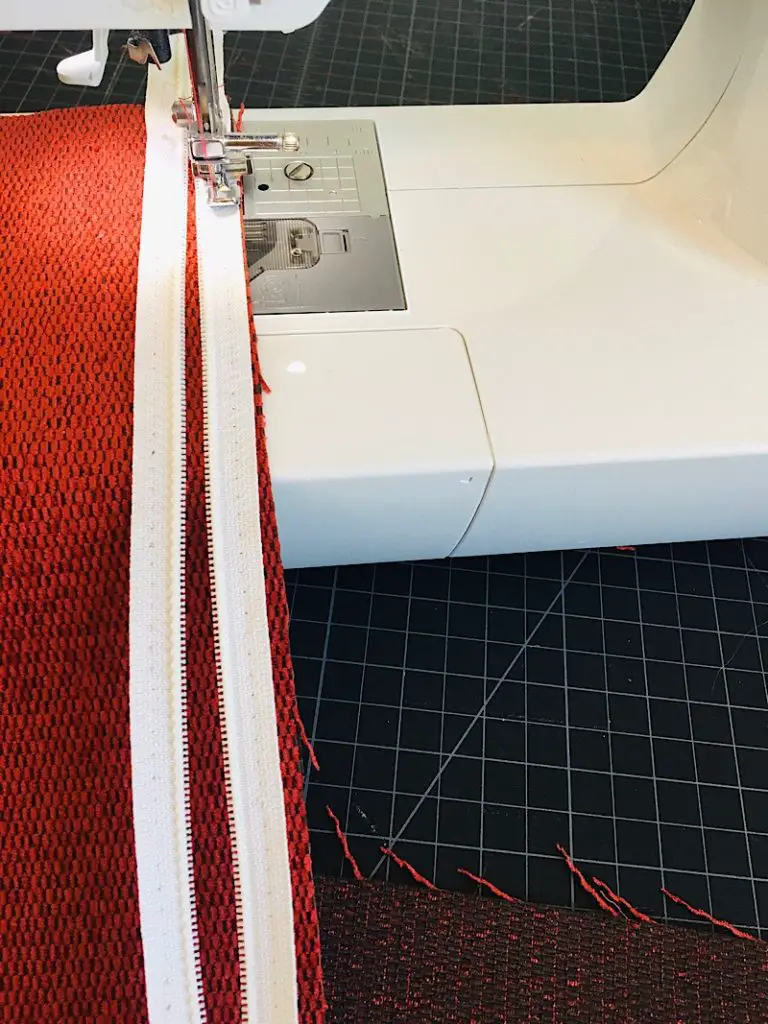
Step 5. Add Edging or Trim
After all the new fabric has been attached to the couch, the last step is to cover any visible edges or staples with trim or tacks.
There are lots of different options for this. You can buy new individual tacks, or tack strips that have faux tacks with a real one every few inches.
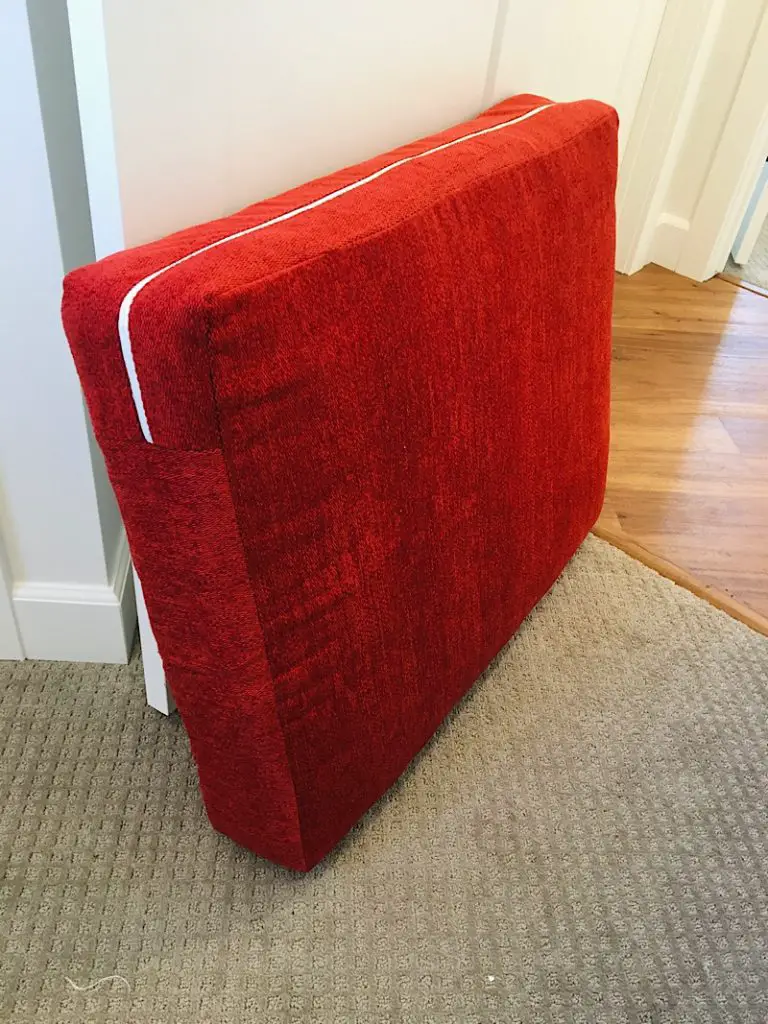
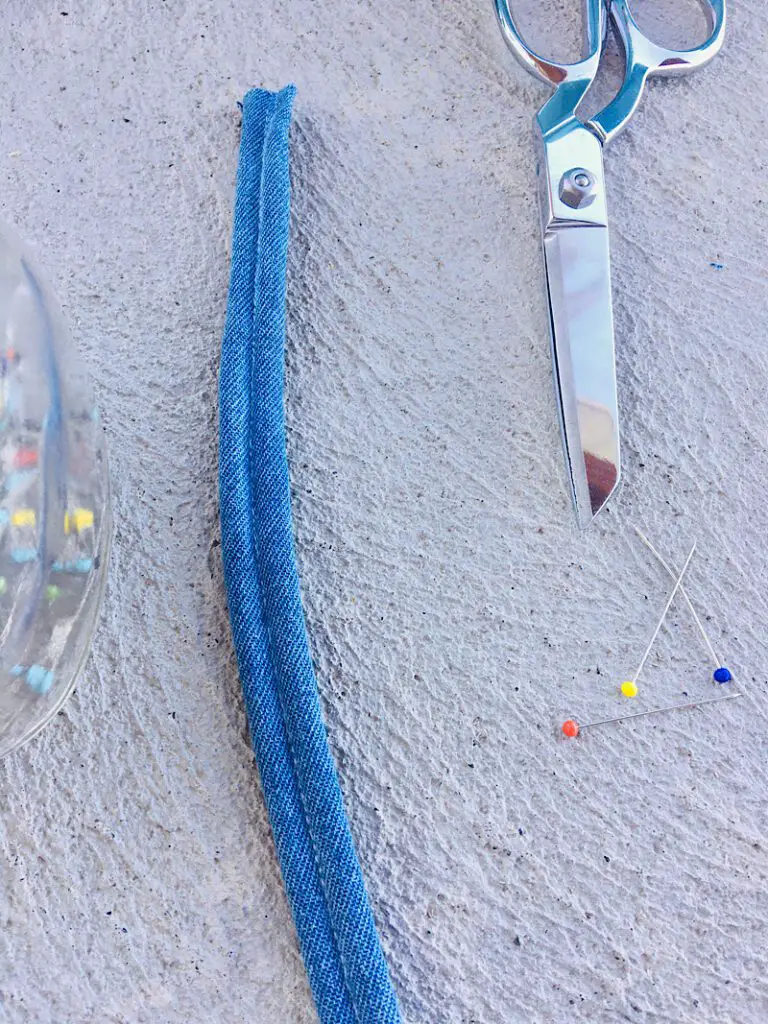
Or you can attach double welt cord or trim with staples or hot glue. I chose to make my own double welt cord with my remaining red fabric and hide the staple in the channel between both cords.
When attaching the cord or trim, try to arrange it so the raw edges end up under the bottom of the couch. If you can’t, then you can fold the raw edges under the trim itself to hide them.
I wrote a more in depth tutorial specifically about how to attach double cord/piping trim to an armchair I reupholstered, and the technique was exactly the same as for this couch. It goes over the pros and cons of staples and hot glue, if you need more help!
Step 6. Reattach Dust Cover & Legs
After the trim is completed, you need to attach the dust cover on the bottom. I used an grey bed sheet since my old dust cover was ripped, and it saved me a few bucks.
Fold the raw edges under and staple the dust cover to the bottom frame. Make sure it is smooth and tight.
Then, reattach the legs if needed and flip the couch back over!
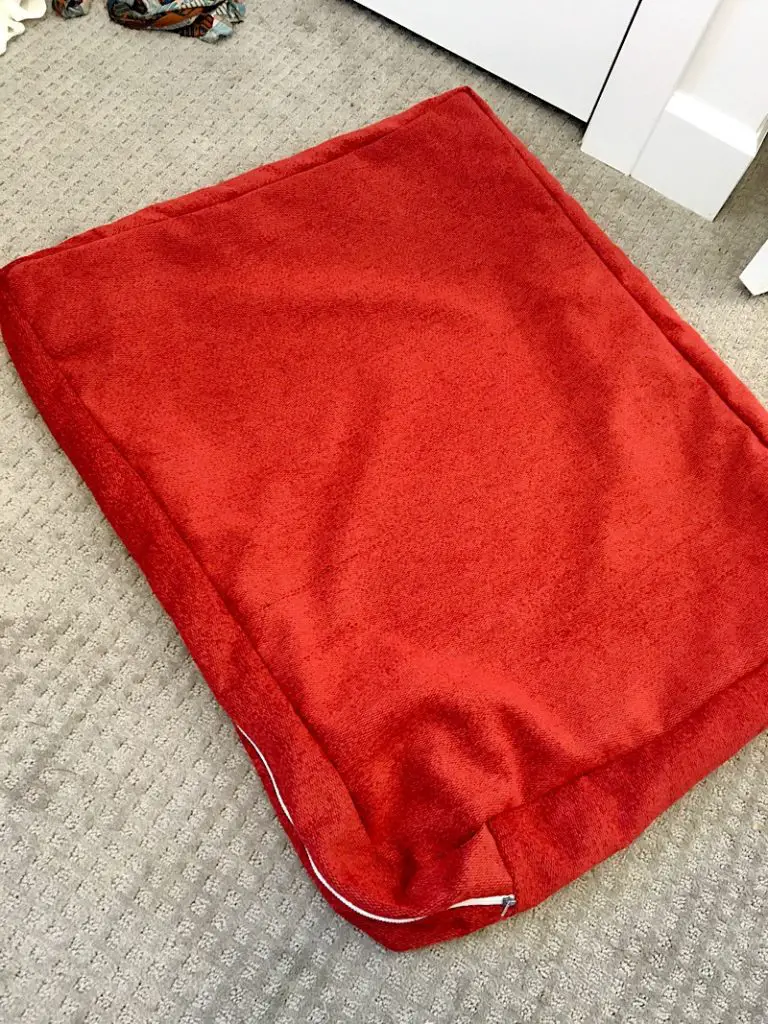
Step 7. Sew The New Cushion Covers
Here is the big sewing part of this tutorial!
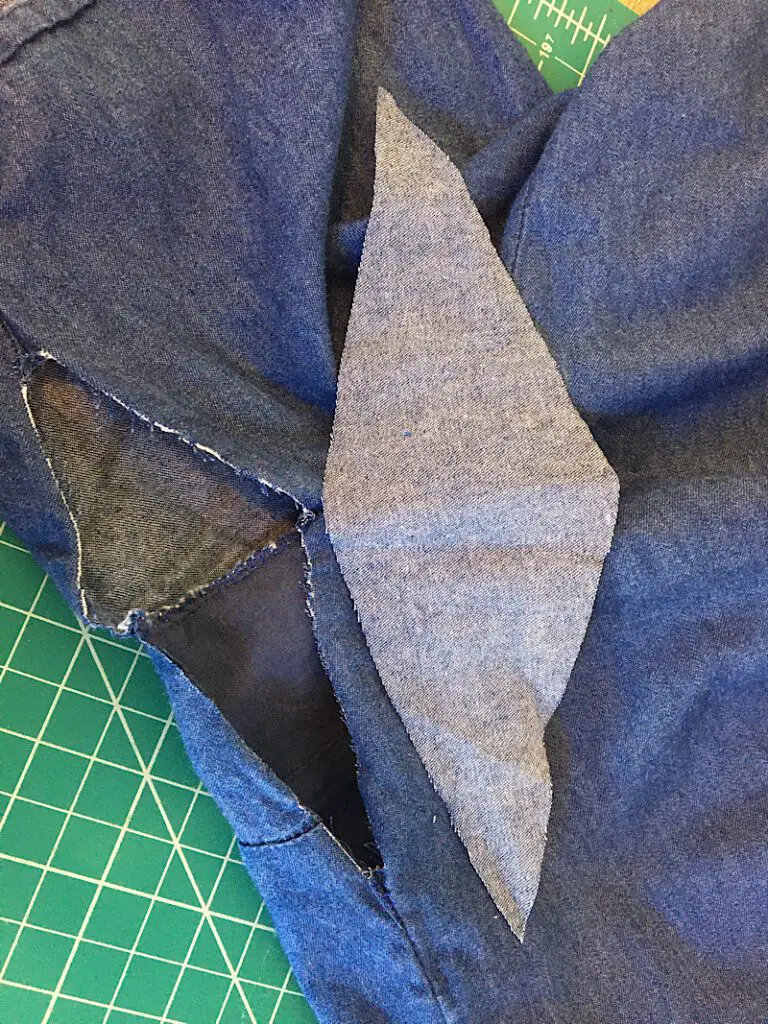
To make the new cushion covers for the couch, use your seam ripper to take apart the old cushions, and measure each piece to cut out matching pieces of your new fabric.
I also re-used the old zippers on the new cushions by carefully unpicking them.
My old cushions had piping on them, but I chose to not do piping for the new cushions. But if you want to add piping to your cushions, you can do that too.
Then sew together the pieces you cut out to make the new cover, and fit it onto the foam cushion.
The top cushions on my couch had a bit of fancy folding around the corners that I had to try to copy on the new fabric. I didn’t line it up perfectly but it still looked good.
I also added velcro to the back of the tip cushions so they would stick to the back of the couch.
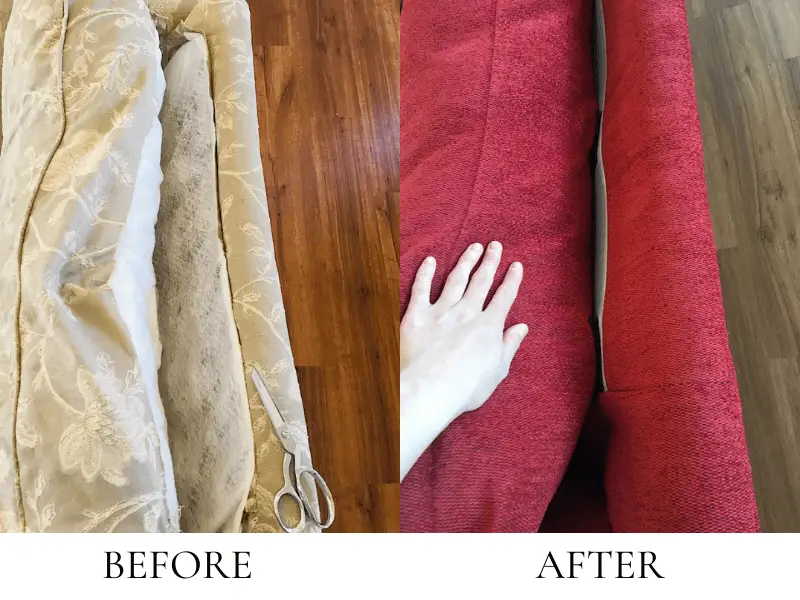
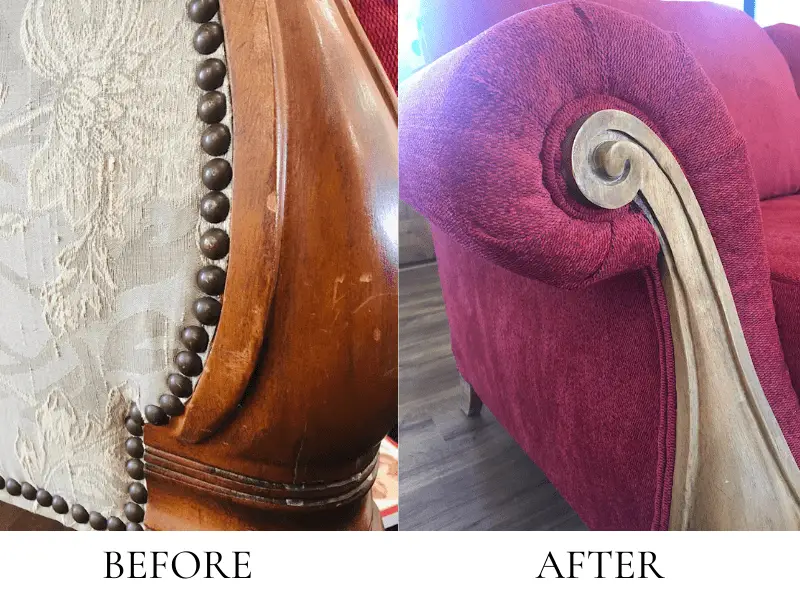
After all the cushions are done, you are finished! Lets see what my couch looks like now!
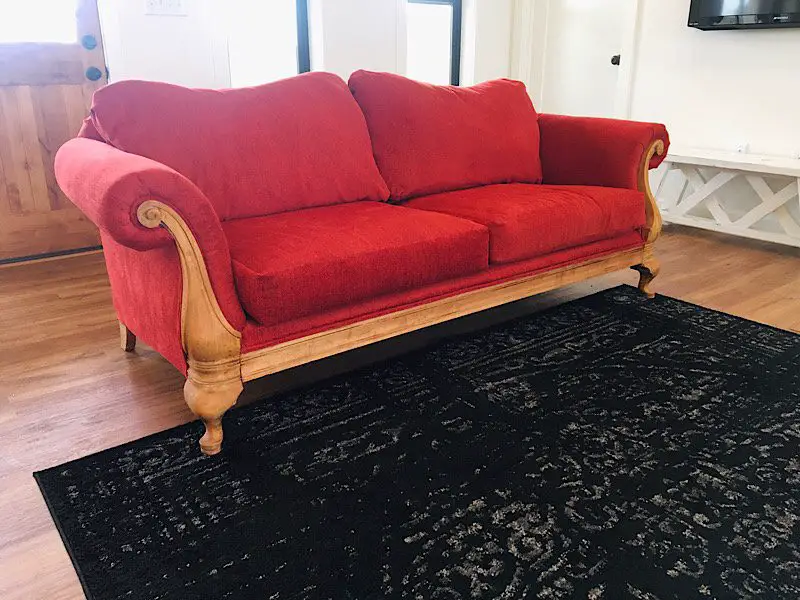
Oh my word! I was so excited when I was finally done. It looks so awesome.
Conclusion
Now take a step back and see what you have done!
That is one of the most intense DIY’s I have ever done. But you won’t believe how many people are shocked when I tell them I did it myself. And since I found a deal for this fabric, it only cost me around $200 to complete this entire thing, which is amazing compared to what a new couch would cost!
After these several days, I needed a break from my sewing machine for a while. haha!
If you have any questions, don’t hesitate to comment below. I will do my best to help you out.
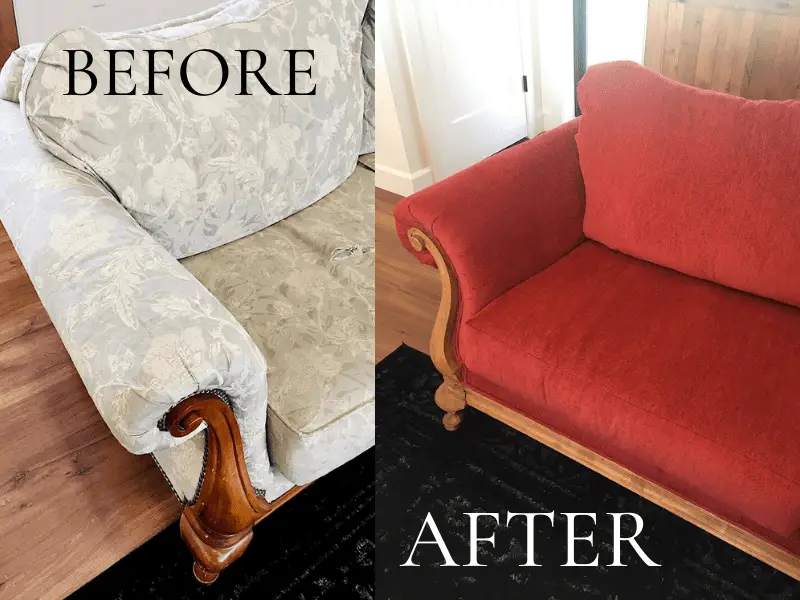
Here are a few more side by side comparisons for you. Please feel free to Pin one of them to Pinterest so you can reference this post later when you are ready to tackle it!
We’re renovating my grandma’s house after the holiday season, and we’ve decided to get reupholstering done for the furniture instead of buying new pieces. I appreciate the tip when you told us to get a fabric that is thick and strong enough to withstand the heavy wear and tear of being sat on when getting our couch reupholstered. I’ll take note of this and look where to get reupholstery done soon.
Thanks Anna! How fun!
keep it up!
Thank you, it was crazy around here for a few days!
Thank you for this incredible post and the detailed you provided! I have a beautiful set of antique chesterfields from my husband’s grandparents but the fabric is getter really worn. I love the wood work on them and I’ve been thinking of ways to restore them without it costing me a fortune. This post is so encouraging, I think I might just try it!
Lexi, I am so glad you found it helpful! I hope your project goes well. The first upholstery I did was a small chair which was good to practice on. It really is mostly just removing, tracing, and replacing!
Hi! Do you have a tutorial for how you made your own cording? Thanks!
Hi meg! I do, Use the search bar in my website and search for “double piping”, I have a diy tutorial as well as a post about how to attach it.
We’re clearing out my grandma’s house next week since we will be selling the house soon, so I called dibs on her old couch that I was planning to use in my condo unit once I’ve had it fixed and reupholstered. I found your advice to be quite useful when you told us to go for fabrics that are thick and strong enough to withstand heavy wear and tear if we want to get reupholstery done well. I’ll be sure to remember this while I look for a reupholstering service to hire for my couch makeover soon.